
Postfixでメール送信サーバを作ろう!
ここでは、Postfixのインストール手順を掲載しています。
※CentOS 5のサポートは2017年3月をもって終了していますが、旧コンテンツとしてこちらのページは残しておきます。
[広告]
メール送受信の仕組み
手紙を出すとき、通常[ポスト]→[最寄りの郵便局]→[宛先最寄りの郵便局]→[宛先郵便受け]の順に手紙が配送されます。
電子メールも同様に、[送信]→[送信用サーバ(SMTPサーバ)]→[受信用サーバ(POP/IMAPサーバ)]→[受信]の流れとなります。
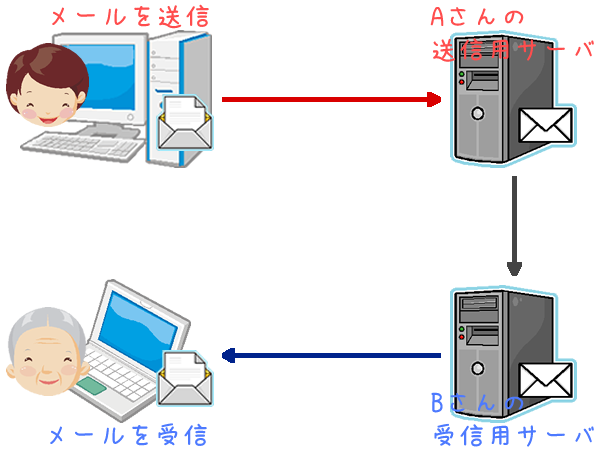
つまり、電子メールの送受信には、送信用と受信用それぞれのサーバが必要です。
今回は送信用サーバにPostfix、受信用サーバにDovecotを使いたいと思います。
Postfixとは…?
Postfixはオープンソースで開発されている送信用サーバ(SMTPサーバ)です。
SMTPとはSimple Mail Transfer Protocolの略で、メール送信のときに使われるルールのことです。SMTPではメールの送信に認証作業がありません。なので、SMTP-AUTHを利用して送信前に認証を行い、不正中継を防止します。
Postfixのインストール
これまでのCentOSにはPostfixがもともとインストールされていましたが、CentOS 5にはインストールされていません。
まだインストールしていない場合はインストールを行いましょう。
[root@co5 ~]# yum -y install postfix
Installed:
  postfix.x86_64 2:2.3.3-7.el5

Dependency Installed:
  mysql.x86_64 0:5.0.95-5.el5_9           perl-DBI.x86_64 0:1.52-2.el5

Complete!
Postfixの設定
それでは、Postfixの設定を行います。
[root@co5 ~]# vi /etc/postfix/main.cf
#myhostname = host.domain.tld
↓
myhostname = www.mhserv.info
#mydomain = domain.tld
↓
mydomain = mhserv.info
#myorigin = $mydomain
↓
myorigin = $mydomain (@以下にドメインを付加する)
#inet_interfaces = all
#inet_interfaces = $myhostname
#inet_interfaces = $myhostname, localhost
inet_interfaces = localhost
↓
inet_interfaces = all (外部からのメール受信を許可する)
#inet_interfaces = $myhostname
#inet_interfaces = $myhostname, localhost
#inet_interfaces = localhost
mydestination = $myhostname, localhost.$mydomain, localhost
#mydestination = $myhostname, localhost.$mydomain, localhost, $mydomain
↓
#mydestination = $myhostname, localhost.$mydomain, localhost (ドメイン宛てのメール受信を許可する)
mydestination = $myhostname, localhost.$mydomain, localhost, $mydomain
#home_mailbox = Maildir/
↓
home_mailbox = Maildir/ (メールの保存形式をMaildirに設定)
#smtpd_banner = $myhostname ESMTP $mail_name
↓
smtpd_banner = $myhostname ESMTP unknown (メールサーバ名を非表示に設定)
また、最後尾にSMTP-AUTH用の設定を書き込みます。
smtpd_sasl_auth_enable = yes
smtpd_sasl_local_domain = $mydomain
smtpd_recipient_restrictions = permit_mynetworks, permit_sasl_authenticated, reject_unauth_destination
SMTP-AUTHの有効化
SMTP-AUTHに必要なsaslauthdを起動します。
今回はCentOSのユーザアカウントを使って認証を行うこととします。もし送信用ユーザを別に設定をしたい場合はこちらを参考にしてください。
[root@co5 ~]# /etc/rc.d/init.d/saslauthd start
saslauthd を起動中: [ OK ]
[root@co5 ~]# chkconfig saslauthd on
[root@co5 ~]# chkconfig --list saslauthd
saslauthd 0:off 1:off 2:on 3:on 4:on 5:on 6:off
Sendmailの停止
CentOS 5にはSendmailというSMTPサーバがあらかじめインストールされています。Postfixと競合するので、まずはSendmailを停止します。
[root@co5 ~]# /etc/rc.d/init.d/sendmail stop
sm-client を停止中:                                        [  OK  ]
sendmail を停止中:                                         [  OK  ]
[root@co5 ~]# chkconfig sendmail off
[root@co5 ~]# chkconfig --list sendmail
sendmail 0:off 1:off 2:off 3:off 4:off 5:off 6:off
メールサーバの切り替え
Sendmailに設定されていたサーバをPostfixに切り替えます。
[root@co5 ~]# alternatives --config mta
2 プログラムがあり 'mta' を提供します。

  選択       コマンド
-----------------------------------------------
*+ 1           /usr/sbin/sendmail.sendmail
   2           /usr/sbin/sendmail.postfix

Enter を押して現在の選択 [+] を保持するか、選択番号を入力します:2
Postfixの起動
[root@co ~]# /etc/rc.d/init.d/postfix start
postfix を起動中: [ OK ]
[root@co ~]# chkconfig postfix on
[root@co ~]# chkconfig --list postfix
postfix 0:off 1:off 2:on 3:on 4:on 5:on 6:off
メール用ユーザの追加
今回はメールの送受信に、CentOSのアカウントを使用します。SSHにログインしない形でメール送信用のユーザアカウントを作成しておきます。
ここでは、仮に「test」ユーザーを作成します。
[root@co5 ~]# useradd -s /sbin/nologin test
[root@co5 ~]# passwd test
Changing password for user test.
New UNIX password: アカウントパスワード
Retype new UNIX password: パスワード再入力
passwd: all authentication tokens updated successfully.
続いて、SASL認証を行うユーザーを登録します。
ドメイン名、ユーザー名、パスワードはご自身の環境に合わせて変更してください。
[root@co5 ~]# saslpasswd2 -u mhserv.info -c test
Password: アカウントパスワード
Again (for verification): パスワード再入力
[root@co5 ~]# chmod 640 /etc/sasldb2
[root@co5 ~]# chgrp postfix /etc/sasldb2
[root@co5 ~]# /usr/sbin/sasldblistusers2
test@mhserv.info: userPassword
上記の通り、作成したユーザーが表示されれば、登録作業は完了です。
OP25B対策について
OP25B(Outbound Port 25 Blocking)についてはこちらを参考に設定してください。
不正中継拒否テスト
構築したメールサーバを利用して、メールの不正中継が行われないかをテストします。
まずは、open relay checkerにアクセスします。
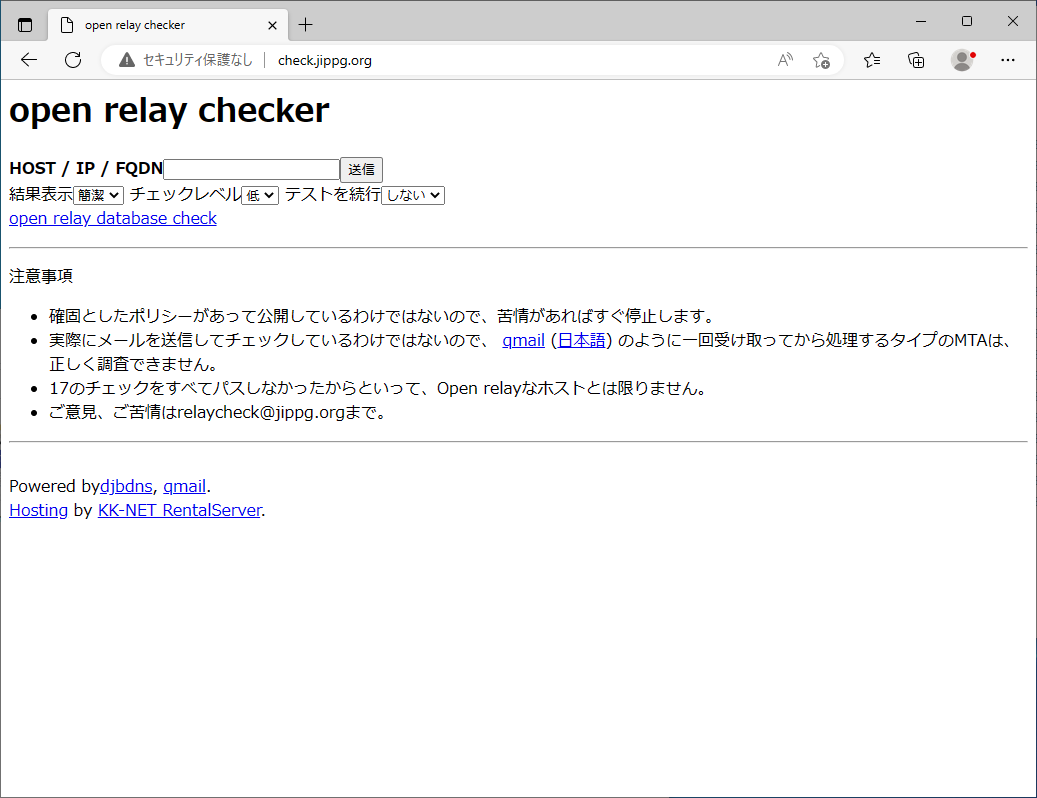 |
ホスト名欄に自分のドメインを入力し、[送信]をクリックします。 お好みに応じて、チェックレベルを変更してください。 |
![[OK]を確認](/images/mail/orc_002.png) |
テストが開始されます。 テスト終了後、各項目に"OK"と表示されていれば大丈夫です。 |
Dovecotの設定へと続きます。
今回新しく登場したコマンド
[広告]
トップページ
CentOS 5
○準備
○仮想化準備(VMware)
○仮想化準備(Hyper-V)
○仮想化準備(Proxmox)
○基本操作
○導入
○セキュリティ対策
○Dynamic DNS
○NTPサーバ
○データベース
○WEBサーバ
○FTPサーバ
○メールサーバ
○DNSサーバ
○ファイルサーバ
○その他