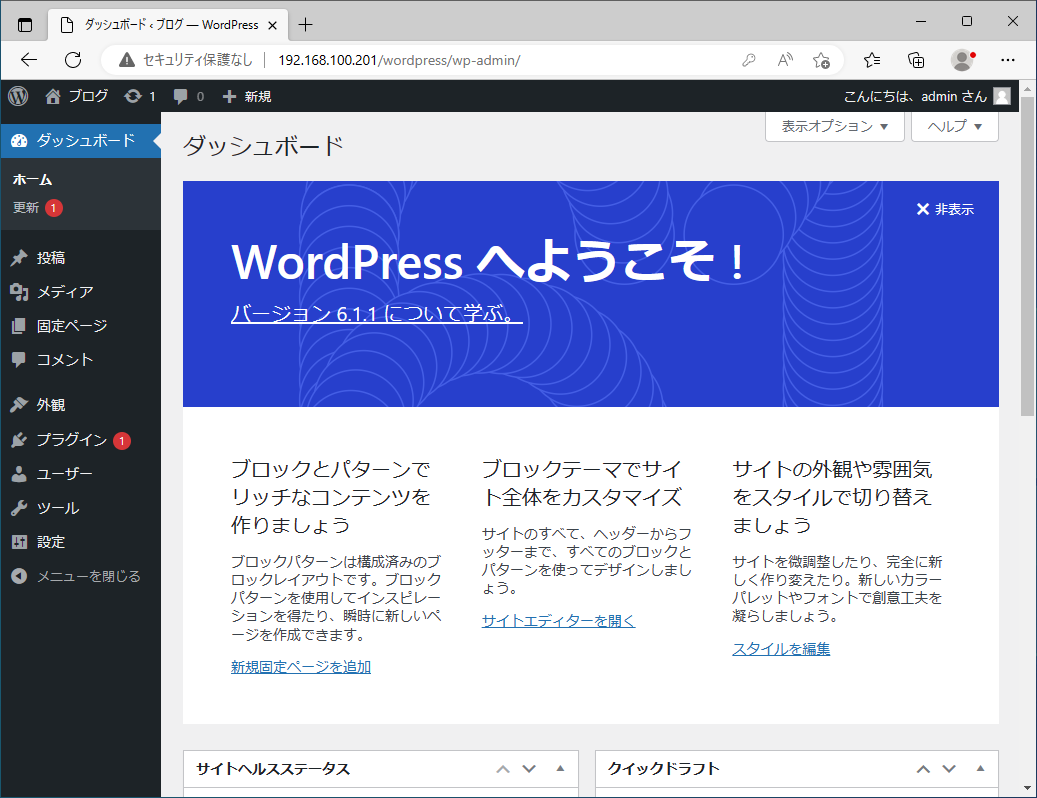
WordPressとは…?
オープンソースで開発されているブログシステムです。PHPとMariaSQLを使って動作し、プラグインやテーマなどが多数公開されているため、自分の好みや目的に合わせてカスタマイズできます。
データベースの作成
WordPressで作成した記事を保存するデータベースを作成します。
MariaSQLへログイン
MariaSQLインストール後に設定したrootパスワードを入力し、MariaSQLにログインします。
[root@rl8 ~]# mysql -u root -p
Enter password:MariaSQLのrootパスワード
Welcome to the MariaDB monitor.  Commands end with ; or \g.
Your MariaDB connection id is 772064
Server version: 10.3.35-MariaDB MariaDB Server

Copyright (c) 2000, 2018, Oracle, MariaDB Corporation Ab and others.

Type 'help;' or '\h' for help. Type '\c' to clear the current input statement.
WordPressのデータベースを作成
WordPressで使うデータベース(wordpress)を作成します。
MariaDB [(none)]> create database wordpress;
Query OK, 1 row affected (0.041 sec)
データベースのユーザを作成
WordPressで使うのユーザ(wordpress)を作成します。ここでのユーザはMariaSQL内でのユーザで、Rocky Linuxのユーザではありません。
パスワードは自由に決めることができます。
MariaDB [(none)]> grant all privileges on wordpress.* to wordpress@localhost identified by 'wordpressユーザのパスワード';
Query OK, 0 rows affected (0.259 sec)
MariaDB [(none)]> exit
Bye
インストール準備
WordPressを動かすのに必要なパッケージをインストールします。
PowerToolsのパッケージ
まずは、PowerToolsというリポジトリに含まれているパッケージをインストールするため、リポジトリを有効にしてからインストールを行います。
[root@rl8 ~]# dnf config-manager --set-enabled powertools
[root@rl8 ~]# dnf -y install --enablerepo=powertools OpenEXR-devel jasper-devel ghostscript-devel lcms2-devel php-devel php-pear make
インストール済み:
  OpenEXR-devel-2.2.0-12.el8.x86_64
  OpenEXR-libs-2.2.0-12.el8.x86_64
  adobe-mappings-cmap-20171205-3.el8.noarch
  adobe-mappings-cmap-deprecated-20171205-3.el8.noarch
  adobe-mappings-pdf-20180407-1.el8.noarch
  autoconf-2.69-29.el8.noarch
  automake-1.16.1-7.el8.noarch
  cmake-filesystem-3.20.2-4.el8.x86_64
  cpp-8.5.0-16.el8_7.x86_64
  cups-libs-1:2.2.6-50.el8.x86_64
  emacs-filesystem-1:26.1-7.el8.noarch
  fontconfig-2.13.1-4.el8.x86_64
  gcc-8.5.0-16.el8_7.x86_64
  gcc-c++-8.5.0-16.el8_7.x86_64
  gl-manpages-1.1-15.20161227.el8.noarch
  glibc-devel-2.28-211.el8.x86_64
  glibc-headers-2.28-211.el8.x86_64
  google-droid-sans-fonts-20120715-13.el8.noarch
  ilmbase-2.2.0-13.el8.x86_64
  ilmbase-devel-2.2.0-13.el8.x86_64
  isl-0.16.1-6.el8.x86_64
  jasper-devel-2.0.14-5.el8.x86_64
  jasper-libs-2.0.14-5.el8.x86_64
  jbig2dec-libs-0.16-1.el8.x86_64
  jbigkit-libs-2.1-14.el8.x86_64
  kernel-headers-4.18.0-425.13.1.el8_7.x86_64
  keyutils-libs-devel-1.5.10-9.el8.x86_64
  krb5-devel-1.18.2-22.el8_7.x86_64
  lcms2-2.9-2.el8.x86_64
  lcms2-devel-2.9-2.el8.x86_64
  libICE-1.0.9-15.el8.x86_64
  libSM-1.2.3-1.el8.x86_64
  libX11-1.6.8-5.el8.x86_64
  libX11-common-1.6.8-5.el8.noarch
  libX11-devel-1.6.8-5.el8.x86_64
  libX11-xcb-1.6.8-5.el8.x86_64
  libXau-1.0.9-3.el8.x86_64
  libXau-devel-1.0.9-3.el8.x86_64
  libXcursor-1.1.15-3.el8.x86_64
  libXext-1.3.4-1.el8.x86_64
  libXfixes-5.0.3-7.el8.x86_64
  libXi-1.7.10-1.el8.x86_64
  libXinerama-1.1.4-1.el8.x86_64
  libXmu-1.1.3-1.el8.x86_64
  libXrandr-1.5.2-1.el8.x86_64
  libXrender-0.9.10-7.el8.x86_64
  libXt-1.1.5-12.el8.x86_64
  libXxf86misc-1.0.4-1.el8.x86_64
  libXxf86vm-1.1.4-9.el8.x86_64
  libcom_err-devel-1.45.6-5.el8.x86_64
  libfontenc-1.1.3-8.el8.x86_64
  libglvnd-1:1.3.4-1.el8.x86_64
  libglvnd-core-devel-1:1.3.4-1.el8.x86_64
  libglvnd-devel-1:1.3.4-1.el8.x86_64
  libglvnd-egl-1:1.3.4-1.el8.x86_64
  libglvnd-gles-1:1.3.4-1.el8.x86_64
  libglvnd-glx-1:1.3.4-1.el8.x86_64
  libglvnd-opengl-1:1.3.4-1.el8.x86_64
  libgs-9.27-4.el8.x86_64
  libgs-devel-9.27-4.el8.x86_64
  libidn-1.34-5.el8.x86_64
  libijs-0.35-5.el8.x86_64
  libjpeg-turbo-1.5.3-12.el8.x86_64
  libjpeg-turbo-devel-1.5.3-12.el8.x86_64
  libkadm5-1.18.2-22.el8_7.x86_64
  libmcpp-2.7.2-20.el8.x86_64
  libmpc-1.1.0-9.1.el8.x86_64
  libpaper-1.1.24-22.el8.x86_64
  libselinux-devel-2.9-6.el8.x86_64
  libsepol-devel-2.9-3.el8.x86_64
  libstdc++-devel-8.5.0-16.el8_7.x86_64
  libtiff-4.0.9-26.el8_7.x86_64
  libtool-2.4.6-25.el8.x86_64
  libverto-devel-0.3.2-2.el8.x86_64
  libwayland-client-1.19.0-1.el8.x86_64
  libwayland-server-1.19.0-1.el8.x86_64
  libxcb-1.13.1-1.el8.x86_64
  libxcb-devel-1.13.1-1.el8.x86_64
  libxcrypt-devel-4.1.1-6.el8.x86_64
  libxml2-devel-2.9.7-15.el8_7.1.x86_64
  libxshmfence-1.3-2.el8.x86_64
  m4-1.4.18-7.el8.x86_64
  make-1:4.2.1-11.el8.x86_64
  mcpp-2.7.2-20.el8.x86_64
  mesa-libEGL-22.1.5-2.el8.x86_64
  mesa-libGL-22.1.5-2.el8.x86_64
  mesa-libGLU-9.0.0-15.el8.x86_64
  mesa-libGLU-devel-9.0.0-15.el8.x86_64
  mesa-libgbm-22.1.5-2.el8.x86_64
  mesa-libglapi-22.1.5-2.el8.x86_64
  openjpeg2-2.4.0-5.el8.x86_64
  openssl-devel-1:1.1.1k-7.el8_6.x86_64
  pcre2-devel-10.32-3.el8_6.x86_64
  pcre2-utf16-10.32-3.el8_6.x86_64
  pcre2-utf32-10.32-3.el8_6.x86_64
  perl-Thread-Queue-3.13-1.el8.noarch
  php-devel-7.4.30-1.module+el8.7.0+1067+0a7071cc.x86_64
  php-pear-1:1.10.13-1.module+el8.7.0+1067+0a7071cc.noarch
  php-process-7.4.30-1.module+el8.7.0+1067+0a7071cc.x86_64
  urw-base35-bookman-fonts-20170801-10.el8.noarch
  urw-base35-c059-fonts-20170801-10.el8.noarch
  urw-base35-d050000l-fonts-20170801-10.el8.noarch
  urw-base35-fonts-20170801-10.el8.noarch
  urw-base35-fonts-common-20170801-10.el8.noarch
  urw-base35-gothic-fonts-20170801-10.el8.noarch
  urw-base35-nimbus-mono-ps-fonts-20170801-10.el8.noarch
  urw-base35-nimbus-roman-fonts-20170801-10.el8.noarch
  urw-base35-nimbus-sans-fonts-20170801-10.el8.noarch
  urw-base35-p052-fonts-20170801-10.el8.noarch
  urw-base35-standard-symbols-ps-fonts-20170801-10.el8.noarch
  urw-base35-z003-fonts-20170801-10.el8.noarch
  xorg-x11-font-utils-1:7.5-41.el8.x86_64
  xorg-x11-proto-devel-2020.1-3.el8.noarch
  xorg-x11-server-utils-7.7-27.el8.x86_64
  xz-devel-5.2.4-4.el8_6.x86_64
  zlib-devel-1.2.11-21.el8_7.x86_64

完了しました!
EPELのパッケージ
次にEPELリポジトリに含まれているパッケージもインストールしましょう。
EPELリポジトリの設定をしていない方は初期設定ページをご覧ください。
ImageMagickはWordPress上で画像編集を行うために必要です。
[root@rl8 ~]# dnf -y install --enablerepo=epel ImageMagick ImageMagick-devel php-zip php-gd
インストール済み:
  ImageMagick-6.9.12.77-1.el8.x86_64
  ImageMagick-devel-6.9.12.77-1.el8.x86_64
  ImageMagick-libs-6.9.12.77-1.el8.x86_64
  LibRaw-0.19.5-3.el8.x86_64
  atk-2.28.1-1.el8.x86_64
  cairo-1.15.12-6.el8.x86_64
  fribidi-1.0.4-9.el8.x86_64
  gd-2.2.5-7.el8.x86_64
  gdk-pixbuf2-2.36.12-5.el8.x86_64
  gdk-pixbuf2-modules-2.36.12-5.el8.x86_64
  graphite2-1.3.10-10.el8.x86_64
  graphviz-2.40.1-43.el8.x86_64
  gtk-update-icon-cache-3.22.30-11.el8.x86_64
  gtk2-2.24.32-5.el8.x86_64
  harfbuzz-1.7.5-3.el8.x86_64
  hicolor-icon-theme-0.17-2.el8.noarch
  libXaw-1.0.13-10.el8.x86_64
  libXcomposite-0.4.4-14.el8.x86_64
  libXdamage-1.1.4-14.el8.x86_64
  libXft-2.3.3-1.el8.x86_64
  libXpm-3.5.12-9.el8_7.x86_64
  libdatrie-0.2.9-7.el8.x86_64
  libraqm-0.7.0-4.el8.x86_64
  librsvg2-2.42.7-4.el8.x86_64
  libthai-0.1.27-2.el8.x86_64
  libwebp-1.0.0-5.el8.x86_64
  libwmf-lite-0.2.9-8.el8_0.x86_64
  libzip-1.6.1-1.module+el8.6.0+789+2130c178.x86_64
  pango-1.42.4-8.el8.x86_64
  php-pecl-zip-1.18.2-1.module+el8.6.0+789+2130c178.x86_64
  pixman-0.38.4-2.el8.x86_64
  xorg-x11-fonts-ISO8859-1-100dpi-7.5-19.el8.noarch

完了しました!
[root@rl8 ~]# pecl install imagick
downloading imagick-3.7.0.tgz ...
Starting to download imagick-3.7.0.tgz (360,138 bytes)
.........................................................................done: 360,138 bytes
33 source files, building
running: phpize
Configuring for:
PHP Api Version:         20190902
Zend Module Api No:      20190902
Zend Extension Api No:   320190902
Please provide the prefix of ImageMagick installation [autodetect] : [Enter]

Build process completed successfully
Installing '/usr/include/php/ext/imagick/php_imagick_shared.h'
Installing '/usr/lib64/php/modules/imagick.so'
install ok: channel://pecl.php.net/imagick-3.5.1
configuration option "php_ini" is not set to php.ini location
You should add "extension=imagick.so" to php.ini
PHPの設定
インストールしたImageMagickをPHPに読み込ませます。
[root@rl8 ~]# cp -p /etc/php.ini /etc/php.ini.old
[root@rl8 ~]# echo "extension=imagick.so" >> /etc/php.ini
WordPressのインストール
公式ページからダウンロードして使います。
WordPressの設置
まず、ファイルをダウンロードします。
[root@rl8 ~]# wget http://ja.wordpress.org/latest-ja.zip
--2023-03-09 14:50:05--  https://ja.wordpress.org/latest-ja.zip
ja.wordpress.org (ja.wordpress.org)|198.143.164.252|:443 に接続しています... 接 続しました。
HTTP による接続要求を送信しました、応答を待っています... 200 OK
長さ: 25242251 (24M) [application/zip]
`latest-ja.zip' に保存中

latest-ja.zip       100%[===================>]  24.07M  8.78MB/s 時間 2.7s

2023-03-09 14:50:09 (8.78 MB/s) - `latest-ja.zip' へ保存完了 [25242251/25242251]
ダウンロードしたファイルをwwwディレクトリに解凍します。解凍後、ダウンロードしたファイルはいらないので、削除します。
[root@rl8 ~]# dnf -y install unzip
インストール済み:
  unzip.x86_64 0:6.0-19.el7

完了しました!
[root@rl8 ~]# unzip latest-ja.zip -d /var/www/
Archive:  latest-ja.zip
   creating: /var/www/wordpress/
  inflating: /var/www/wordpress/wp-login.php
  inflating: /var/www/wordpress/wp-cron.php
  inflating: /var/www/wordpress/xmlrpc.php
  inflating: /var/www/wordpress/wp-load.php
   creating: /var/www/wordpress/wp-admin/
・・・・・・
  inflating: /var/www/wordpress/wp-includes/class-walker-comment.php
  inflating: /var/www/wordpress/wp-includes/nav-menu.php
  inflating: /var/www/wordpress/wp-includes/class.wp-dependencies.php
  inflating: /var/www/wordpress/wp-signup.php
  inflating: /var/www/wordpress/wp-links-opml.php
[root@rl8 ~]# rm -f latest-ja.zip
WordPressの初期設定
wordpressディレクトリの権限を変更し、設定ファイルに、データベース名、ユーザ名、パスワードを入力します。
[root@rl8 ~]# chown -R apache:apache /var/www/wordpress/
[root@rl8 ~]# cp /var/www/wordpress/wp-config-sample.php /var/www/wordpress/wp-config.php
[root@rl8 ~]# vi /var/www/wordpress/wp-config.php
// ** MySQL 設定 - こちらの情報はホスティング先から入手してください。 ** //
/** WordPress のためのデータベース名 */
define('DB_NAME', 'database_name_here');
↓
define('DB_NAME', 'wordpress');
/** MySQL データベースのユーザー名 */
define('DB_USER', 'username_here');
↓
define('DB_USER', 'wordpress');
/** MySQL データベースのパスワード */
define('DB_PASSWORD', 'password_here');
↓
define('DB_PASSWORD', 'wordpressユーザのパスワード');
エイリアスの設定
Apacheのエイリアスの設定をし、"http://[IPアドレス]/wordpress/"でアクセスできるようにします。
[root@rl8 ~]# echo Alias /wordpress /var/www/wordpress > /etc/httpd/conf.d/wordpress.conf
Apacheの再起動
PHP、WordPressの設定ファイルを読み込ませるため、ApacheとPHPを再起動します。
[root@rl8 ~]# systemctl restart php-fpm
[root@rl8 ~]# systemctl restart httpd
ブログサイトの設定
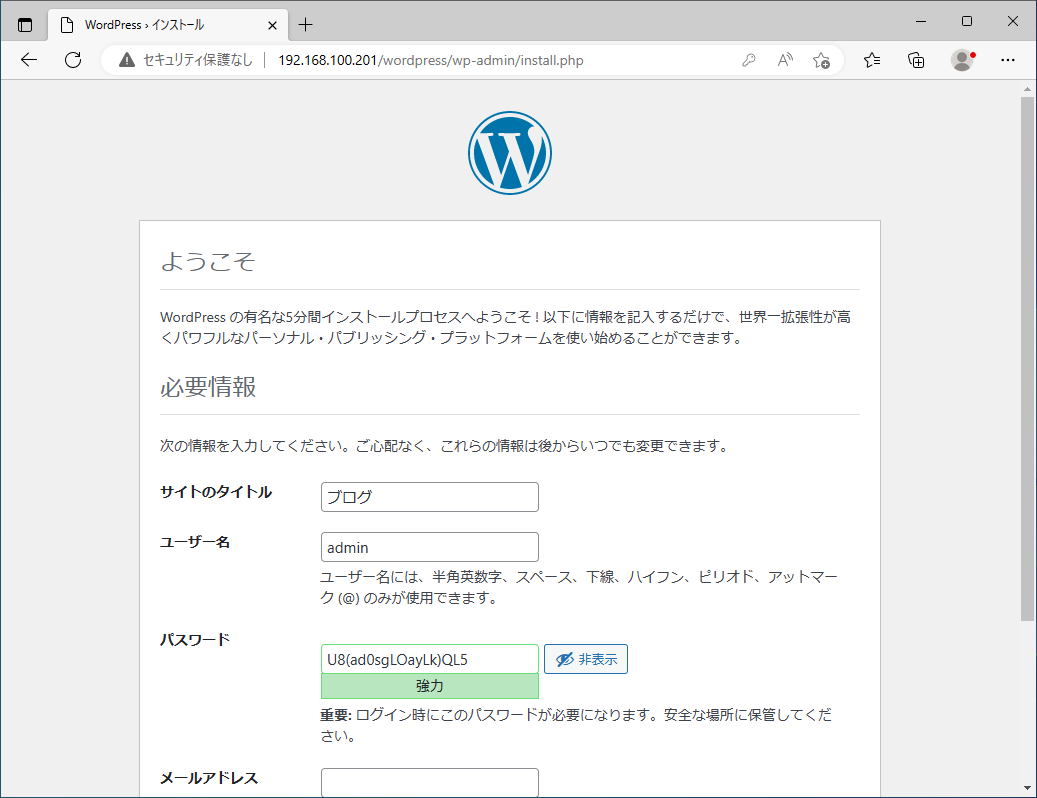
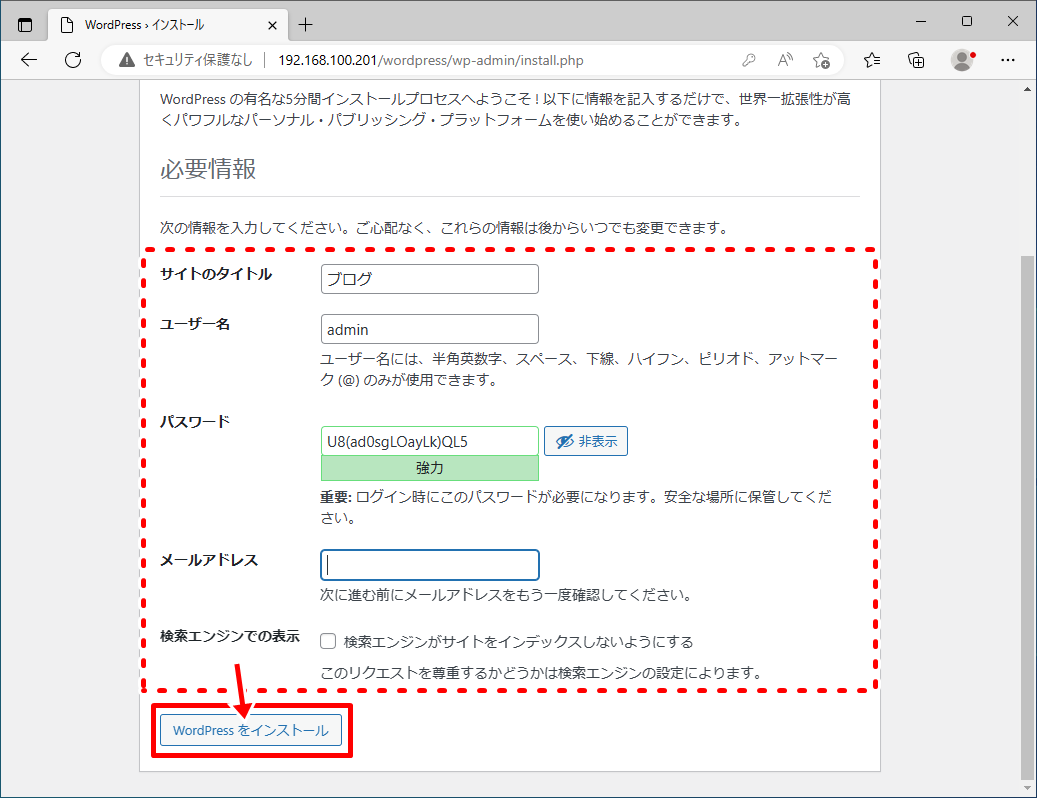
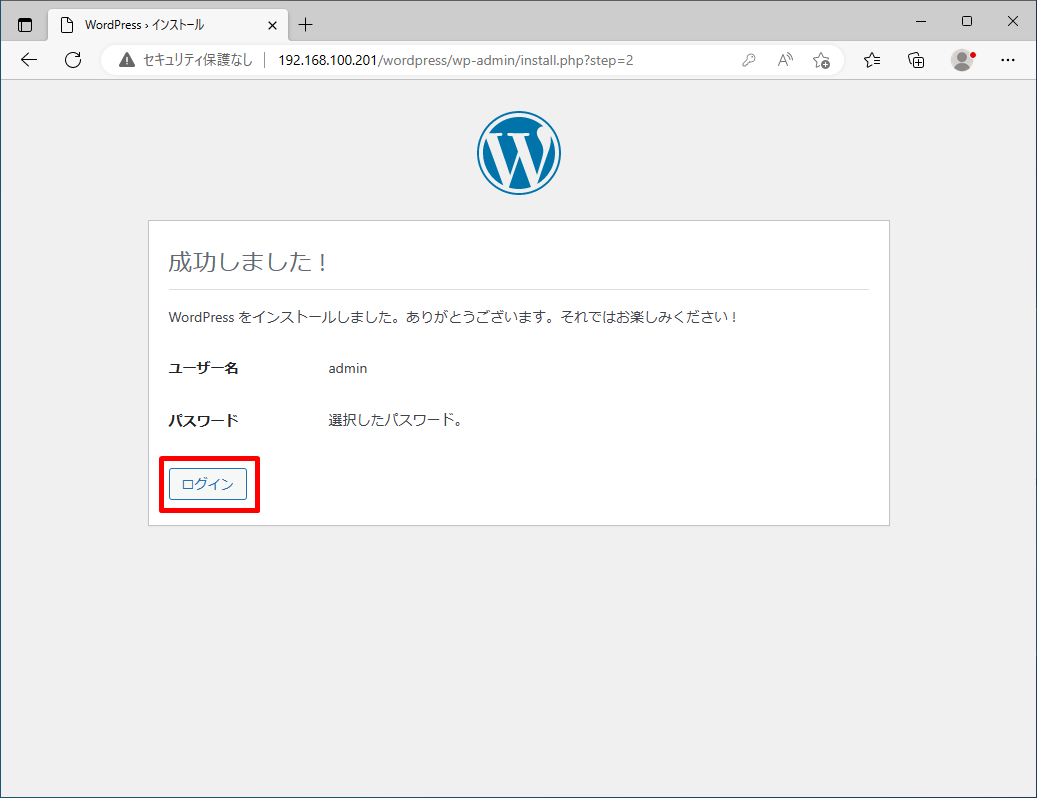
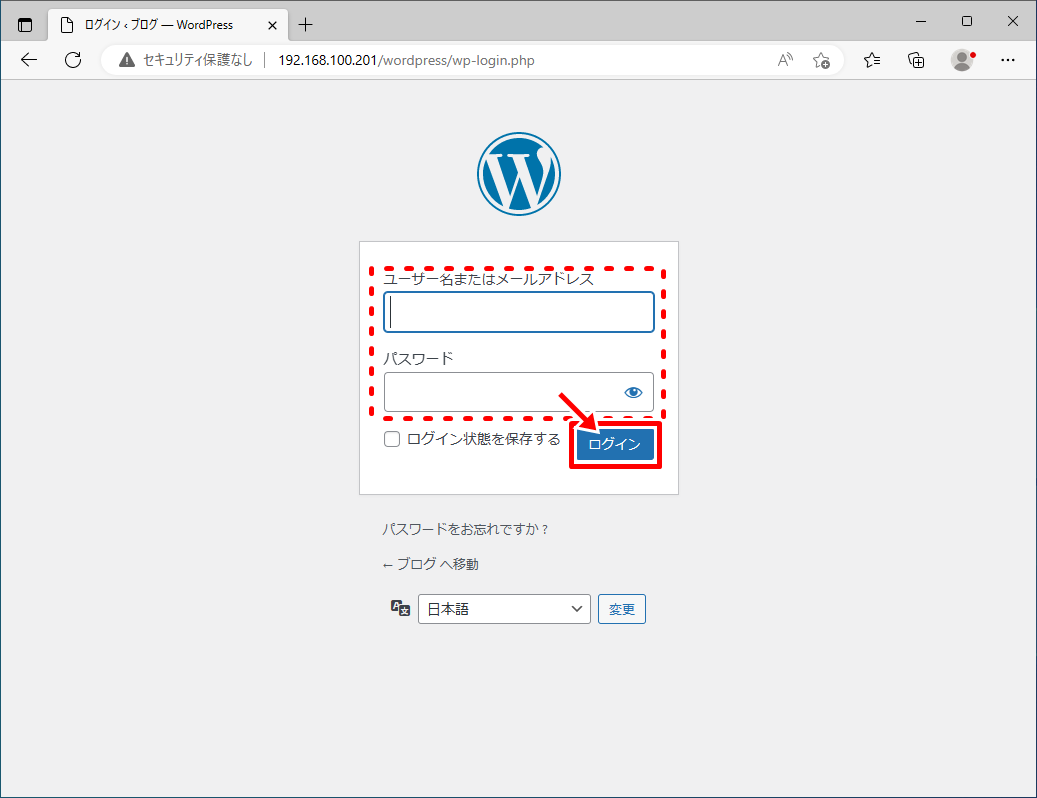
ここから先はブラウザでの操作になります。
初期設定が終わったら、初期設定用のスクリプトを削除しておきます。
[root@rl8 ~]# rm -f /var/www/wordpress/wp-admin/install.php
参考にしたサイト様
今回新しく登場したコマンド
- mysql
- unzip
[広告]
トップページ
Rocky Linux 8
○インストール準備
○仮想化準備(VMware)
○仮想化準備(Hyper-V)
○仮想化準備(Proxmox)
○基本操作
○導入
○セキュリティ対策
○Dynamic DNS
○NTPサーバ
○データベース
○WEBサーバ
○FTPサーバ
○メールサーバ
○DNSサーバ
○ブログシステム
○オンラインストレージ
○その他

