
Let's Encryptで無料の暗号化鍵を発行しよう!
ここでは、無料で使える認証局、Let's Encryptを使った証明書の取得について掲載しています。
[広告]
Let's Encryptとは…?
通常、SSLでの認証に必要な証明書はデジサートやグローバルサインなどの認証局から発行される証明書と鍵を使い、通信の暗号化と発信者の信頼性を確保(実在証明)します。
しかし、この手続きには費用がかかります。
かと言って、自前の証明書と鍵では、通信の暗号化は可能ですが、実在証明をすることはできません。勝手に鍵を作って、「私は安全ですよ^^」と勝手に騒いでるだけ…って状態です。
なので、自前の証明書と鍵を使った場合、ブラウザでは以下のような警告が表示されます。
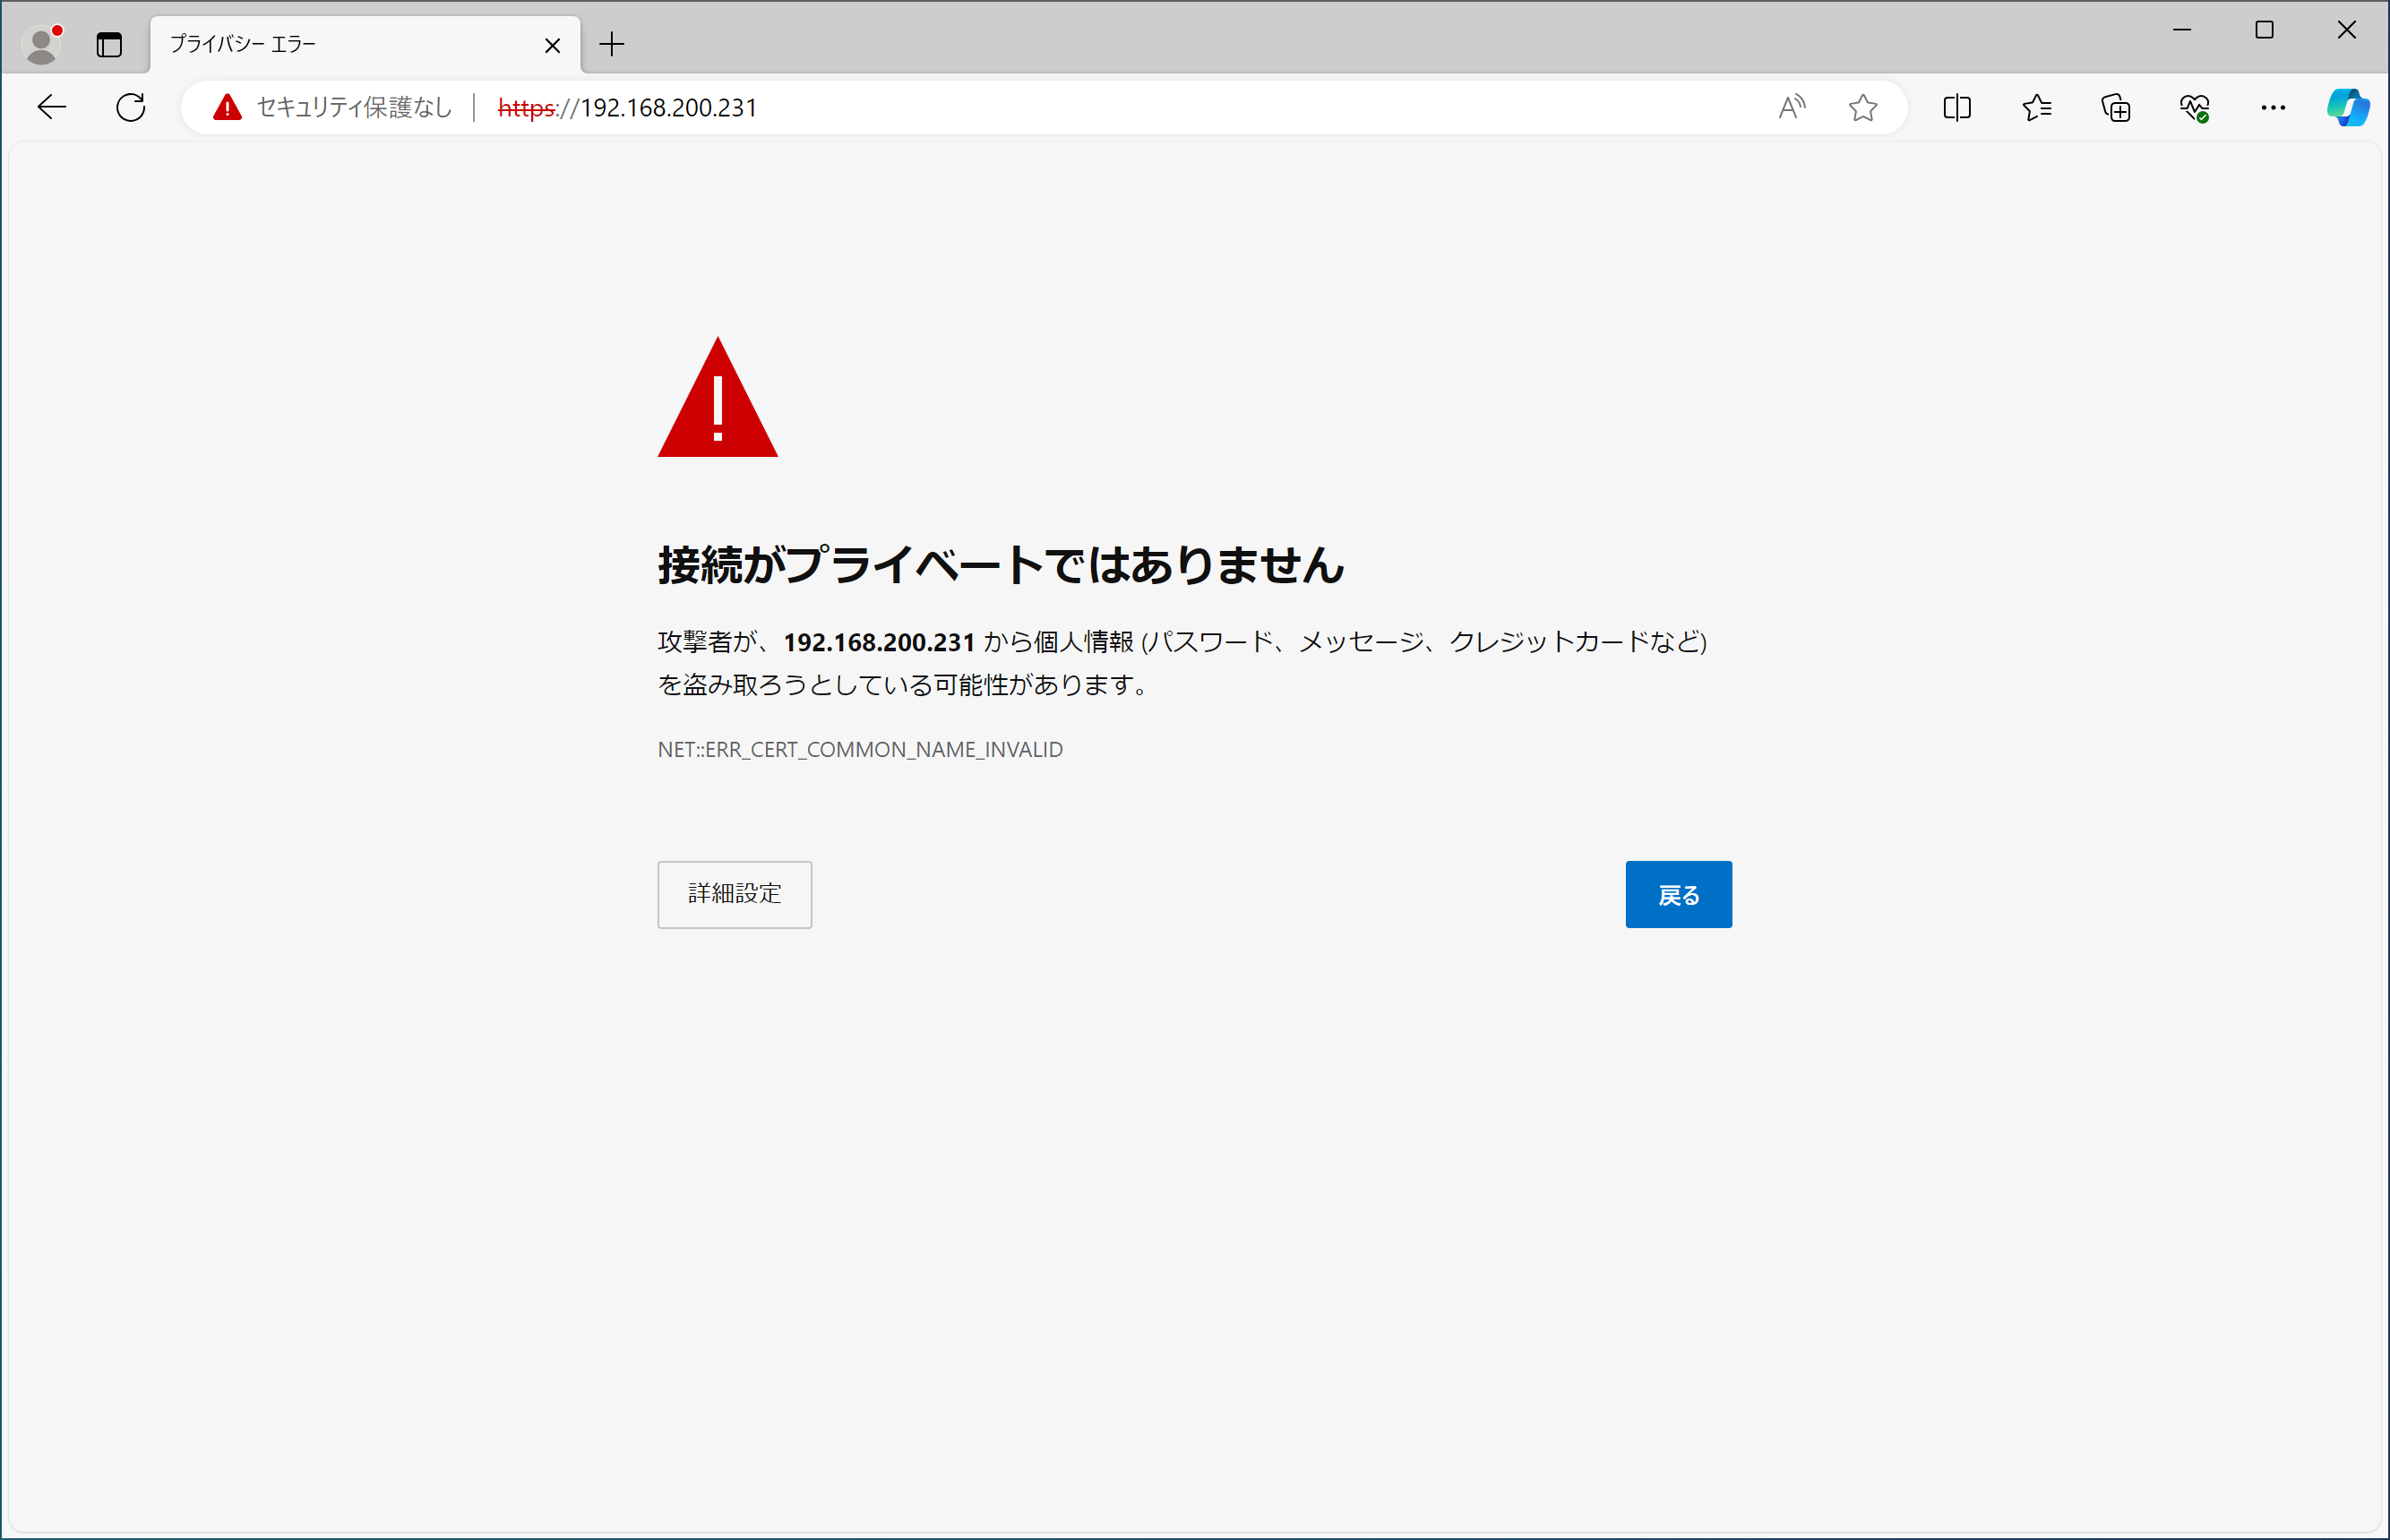
もちろんこのまま使用を続けることも可能ですが、初めてそのサイトを見た人は「え…大丈夫なの?」って思いますよね?でも、所詮自宅サーバ、費用はかけたくない…。
そこで登場するのがLet's Encrypt。Let's Encryptはネット通信の暗号化を広く普及させることを目的に2016年に始まったプロジェクトで、無料で使える認証局です。最近のブラウザなら上でご紹介したような警告が表示されることがありません。
ただし、無料なのはClass 1(ドメイン認証)に限ります。Class 1ではドメインの所有者のみの証明になります。信頼度という点では「自分で発行した証明書よりはマシ」程度に考えた方が良いでしょう。
業務で使う場合は有料のものを検討した方が良いと思いますが、いまやほとんどのブラウザがLet's Encryptに対応していますし、表示上はあまり差がありませんので、「通信の暗号化」だけが目的であれば必要充分です。
Let's Encryptによる認証鍵の発行
前提条件として、以下を満たす必要があります。
- ・ドメイン名、ホスト名でサーバにアクセスできること
Webサーバ構築済みとして話が進みますが、Webサーバ等はこの時点では必要ありません。
[root@rl10 ~]# dnf -y --enablerepo=epel install certbot python3-certbot-apache
インストール済み:
  augeas-libs-1.14.2-0.2.20241029git2de06e0.el10.x86_64
  certbot-4.0.0-1.el10_0.noarch
  fontawesome4-fonts-1:4.7.0-23.el10.noarch
  fonts-filesystem-1:2.0.5-18.el10.noarch
  python-josepy-doc-2.0.0-2.el10_0.noarch
  python3-acme-4.0.0-1.el10_0.noarch
  python3-augeas-1.1.0-14.el10.noarch
  python3-certbot-4.0.0-1.el10_0.noarch
  python3-certbot-apache-4.0.0-1.el10_0.noarch
  python3-cffi-1.16.0-7.el10.x86_64
  python3-charset-normalizer-3.3.2-7.el10.noarch
  python3-configargparse-1.7-5.el10_0.noarch
  python3-configobj-5.0.8-10.el10.noarch
  python3-cryptography-43.0.0-4.el10.x86_64
  python3-distro-1.9.0-5.el10.noarch
  python3-idna-3.7-4.el10.noarch
  python3-josepy-2.0.0-2.el10_0.noarch
  python3-parsedatetime-2.6-1.el10_0.noarch
  python3-ply-3.11-25.el10.noarch
  python3-pyOpenSSL-25.0.0-1.el10_0.noarch
  python3-pycparser-2.20-16.el10.noarch
  python3-pyrfc3339-1.1-20.el10_0.noarch
  python3-pytz-2024.1-3.el10_0.noarch
  python3-requests-2.32.3-2.el10.noarch
  python3-typing-extensions-4.9.0-6.el10.noarch
  python3-urllib3-1.26.19-2.el10.noarch

完了しました!
証明書の生成
Let's Encryptでは、certbot-autoというプログラムが初めから用意されていて、自動的に証明書の発行や更新を行ってくれます。
証明書にはドメイン名(mhserv.info)だけでなく、ホスト名(www.mhserv.infoなど)も複数登録可能なので、URLに使いたいものを登録しておきましょう。(ドメイン名は必須です)
*.mhserv.infoといったワイルドカードを使った証明書も取得可能なようですが、DNSサーバへTXTレコードの登録が必要だったり、証明書の更新が自動でできなかったりするようなので、今回は取得しません。
尚、certbot-autoはWebサーバ機能を持っており、Apacheが動作していると競合してうまく動きません。動いている場合は一度止めておきます。
[root@rl10 ~]# systemctl stop httpd
[root@rl10 ~]# certbot certonly --standalone --agree-tos \
-d mhserv.info(ドメイン名) \
-d www.mhserv.info(ホスト名) \
-m 管理者のメールアドレス
Saving debug log to /var/log/letsencrypt/letsencrypt.log

- - - - - - - - - - - - - - - - - - - - - - - - - - - - - - - - - - - - - - - -
Would you be willing, once your first certificate is successfully issued, to
share your email address with the Electronic Frontier Foundation, a founding
partner of the Let's Encrypt project and the non-profit organization that
develops Certbot? We'd like to send you email about our work encrypting the web,
EFF news, campaigns, and ways to support digital freedom.
- - - - - - - - - - - - - - - - - - - - - - - - - - - - - - - - - - - - - - - -
(Y)es/(N)o: n
Account registered.
Requesting a certificate for mhserv.info and www.mhserv.info

Successfully received certificate.
Certificate is saved at: /etc/letsencrypt/live/mhserv.info/fullchain.pem
Key is saved at:         /etc/letsencrypt/live/mhserv.info/privkey.pem
This certificate expires on 2025-09-21.
These files will be updated when the certificate renews.
Certbot has set up a scheduled task to automatically renew this certificate in the background.

- - - - - - - - - - - - - - - - - - - - - - - - - - - - - - - - - - - - - - - -
If you like Certbot, please consider supporting our work by:
 * Donating to ISRG / Let's Encrypt:   https://letsencrypt.org/donate
 * Donating to EFF:                    https://eff.org/donate-le
- - - - - - - - - - - - - - - - - - - - - - - - - - - - - - - - - - - - - - - -
[root@rl10 ~]# systemctl start httpd
ちなみに、途中の"n"は「暗号化技術に関しての情報をメールで送って良いかい?」の問いに対してのものです。欲しい場合は"y"と回答してください。
証明書の自動更新
Let's Encryptで発行された証明書の有効期限は3ヶ月です。期限が切れる前に更新作業が必要です。
[root@rl10 ~]# vi /etc/cron.monthly/certbot-renew.sh
#!/bin/bash
systemctl stop httpd
certbot renew --force-renew --dry-run
systemctl start httpd
[root@rl10 ~]# chmod +x /etc/cron.monthly/certbot-renew.sh
"--dry-run"(テストのみで更新はしない)を付け、正しく動作するかの確認をします。
[root@rl10 ~]# sh /etc/cron.monthly/certbot-renew.sh
	- - - - - - - - - - - - - - - - - - - - - - - - - - - - - - - - - - - - - - - -
	** DRY RUN: simulating 'certbot renew' close to cert expiry
	**          (The test certificates below ha
	ve not been saved.)

	Congratulations, all renewals succeeded. The following certs have been renewed:
	  /etc/letsencrypt/live/mhserv.info/fullchain.pem (success)
	** DRY RUN: simulating 'certbot renew' close to cert expiry
	**          (The test certificates above have not been saved.)
	- - - - - - - - - - - - - - - - - - - - - - - - - - - - - - - - - - - - - - - -
"all renewals succeeded."と表示され、問題なくテストが進んだら、"--force-renew --dry-run"を削除しましょう。
[root@rl10 ~]# vi /etc/cron.monthly/certbot-renew.sh
#!/bin/bash
systemctl stop httpd
certbot renew
systemctl start httpd
これで、1ヶ月に1回くらいのペースで自動更新を試みてくれます。
あまり短いペースだと更新を弾かれるようですが、翌月には更新されると思います。
MyDNSを利用している方へ
Let's Encryptには、1週間当たりの発行数制限があります。これはドメインごとに管理されているため、自分以外の方がmydns.jpドメインで証明書を作成した場合もカウントされていきます。
発行数制限に引っかかると、以下のような表示が出ます。
An unexpected error occurred:
There were too many requests of a given type :: Error creating new order :: too many failed authorizations
recently: see https://letsencrypt.org/docs/rate-limits/
MyDNSワイルドカード対応証明書発行スクリプトの設置
今回はワイルドカードを使った証明書取得のスクリプトを有志の方が公開しているので、それを使って簡単に取得したいと思います。
[root@rl10 ~]# wget 'https://github.com/disco-v8/DirectEdit/archive/master.zip' -O DirectEdit-master.zip
--2025-06-23 18:34:22--  https://github.com/disco-v8/DirectEdit/archive/master.zip
github.com (github.com) をDNSに問いあわせています... 20.27.177.113
github.com (github.com)|20.27.177.113|:443 に接続しています... 接続しました。
HTTP による接続要求を送信しました、応答を待っています... 302 Found
場所: https://codeload.github.com/disco-v8/DirectEdit/zip/refs/heads/master [続 く]
--2025-06-23 18:34:22--  https://codeload.github.com/disco-v8/DirectEdit/zip/refs/heads/master
codeload.github.com (codeload.github.com) をDNSに問いあわせています... 20.27.177.114
codeload.github.com (codeload.github.com)|20.27.177.114|:443 に接続しています... 接続しました。
HTTP による接続要求を送信しました、応答を待っています... 200 OK
長さ: 特定できません [application/zip]
`DirectEdit-master.zip' に保存中

DirectEdit-master.z     [ <=>                ]   4.23K  --.-KB/s 時間 0s

2025-06-23 18:34:23 (86.4 MB/s) - `DirectEdit-master.zip' へ保存終了 [4327]
[root@rl10 ~]# unzip DirectEdit-master.zip
Archive:  DirectEdit-master.zip
50256b3e36a0974800bf6a17bfb8eafbb641e12c
   creating: DirectEdit-master/
  inflating: DirectEdit-master/README.md
  inflating: DirectEdit-master/txtdelete.php
  inflating: DirectEdit-master/txtedit.conf
  inflating: DirectEdit-master/txtregist.php
[root@rl10 ~]# rm -f DirectEdit-master.zip
[root@rl10 ~]# mv DirectEdit-master /opt/
ワイルドカード対応証明書発行スクリプトの設定
設定ファイルにアカウントの情報を入力します。
[root@rl10 ~]# cd /opt/DirectEdit-master
[root@rl10 DirectEdit-master]# vi txtedit.conf
<?php
    $MYDNSJP_URL       = 'https://www.mydns.jp/directedit.html';
    $MYDNSJP_MASTERID  = 'MyDNSのID';
    $MYDNSJP_MASTERPWD = 'MyDNSのパスワード';
    $MYDNSJP_DOMAIN = '取得したドメイン';
?>
パーミッションの設定
スクリプトにパーミッションの設定を行います。
[root@rl10 DirectEdit-master]# chown root:root ./
[root@rl10 DirectEdit-master]# chmod 700 ./*.php
[root@rl10 DirectEdit-master]# chmod 600 ./*.conf
証明書の取得
設定が終わったら、実際に証明書を発行してもらいましょう。
[root@rl10 DirectEdit-master]# certbot certonly --manual \
--preferred-challenges=dns \
--manual-auth-hook /opt/DirectEdit-master/txtregist.php \
--manual-cleanup-hook /opt/DirectEdit-master/txtdelete.php \
-d 取得したドメイン -d *.取得したドメイン \
--server https://acme-v02.api.letsencrypt.org/directory \
--agree-tos -m 管理者のメールアドレス \
--manual-public-ip-logging-ok
Saving debug log to /var/log/letsencrypt/letsencrypt.log
Plugins selected: Authenticator manual, Installer None
Obtaining a new certificate
Performing the following challenges:
dns-01 challenge for mhserv.mydns.jp
dns-01 challenge for mhserv.mydns.jp
Waiting for verification...
Cleaning up challenges

IMPORTANT NOTES:
 - Congratulations! Your certificate and chain have been saved at:
   /etc/letsencrypt/live/mhserv.mydns.jp/fullchain.pem
   Your key file has been saved at:
   /etc/letsencrypt/live/mhserv.mydns.jp/privkey.pem
   Your cert will expire on 2019-03-24. To obtain a new or tweaked
   version of this certificate in the future, simply run certbot-auto
   again. To non-interactively renew *all* of your certificates, run
   "certbot-auto renew"
 - If you like Certbot, please consider supporting our work by:

   Donating to ISRG / Let's Encrypt:   https://letsencrypt.org/donate
   Donating to EFF:                    https://eff.org/donate-le
参考にしたサイト様
Qiita - さくらのVPS(Cent OS6.8)でLet's Encryptを自動更新する方法
Qiita - 無料でHTTPS化できる「Let's Encrypt」をやってみた
Qiita - 突然GitHubとhttps通信できなくなったときの解決メモ
CPoint LAB. news - Let’s Encrypt + MyDNS でワイルドカードSSL証明書を自動更新する方法
今回新しく登場したコマンド
[広告]
トップページ
Rocky Linux 10
○インストール準備
○仮想化準備(VMware)
○仮想化準備(Hyper-V)
○仮想化準備(Proxmox)
○基本操作
○導入
○セキュリティ対策
○Dynamic DNS
○NTPサーバ
○データベース
○WEBサーバ
○FTPサーバ
○メールサーバ
○DNSサーバ
○ブログシステム
○その他